Having a second monitor for your Windows 10 or Windows 11 computer is a convenient and easy way to enhance your workspace, boost productivity levels, and make gaming time all that more immersive. But, what do you do when you get the message: Windows cannot detect the second monitor, second monitor not detected, or didn’t detect another display?
While the plug and play process is usually seamless, you can still come across a second monitor that just wants to be difficult. In this guide, we will cover the most common solutions on both the hardware and software sides, so you can get your second monitor up and running as quickly as possible.
4 basic steps to fix the second monitor not detected issue
When fixing the second monitor not detected issue, you should try these basic steps first, just to be safe.
1. Restart your PC
The most basic of basic steps, and it may feel dumb to do it, but sometimes turning it off and on again can really solve a lot of issues.
2. See if you have any Windows updates
If your Windows OS is outdated, you might be missing some necessary firmware. Make sure you properly download and install all Windows updates to avoid this.

3. Do you have more than two monitors? Try connecting one extra first
It’s possible that your computer is just having trouble recognizing multiple peripherals at once. Working with one at a time can help sort this issue out, as well as these extra steps:
- First, disconnect all accessories except the additional monitor (mouse, keyboard, storage devices, etc.).
- Check the connecting cable for a good fit and no obvious damage.
- Try using a different cable.
- Try connecting the extra monitor to a different computer.
Each of these steps can help isolate where the problem is, if not solve it altogether.
4. Are you using a TV as a monitor?
It may have an overscan, underscan, or relax mode enabled. Make sure these are disabled alongside any aspect ratio modes.
Hardware side solutions to the second monitor not detected issue
Hardware issues are usually easy to find and even easier to resolve. Simply swap out the defective part for a new one. These steps can help you figure out if a part isn’t working the way it should be.
1. Turn your monitor screen off and then on again
Specifically, turn your extra display off and on again while it’s plugged in. The startup sequence may be enough to make your computer recognize it.
2. Check your display adapter
It’s better to check that the display is properly plugged in on both ends, just to be safe.
3. Check to see if the monitor is connected to a power source
As above, but also make sure the monitor is properly connected to power.
4. Check your cables
Check your cable for a secure fit and inspect if you can see any wear and tear on it. Wear and tear on cables could be anywhere along the length of them, but more often you’ll find signs of it near the ends.
Additionally, changing the connection type (i.e., VGA or HDMI) may also help the monitor be detected. If you have a spare cable available, try swapping out the cable altogether.
5. Remove all other peripheral devices
Try restarting with only the bare minimum plugged in. If something else is interfering with the monitor, something may be wrong with that part.
6. Verify the correct input connection and try a different monitor connection port
If your monitor requires a specific port or a dedicated port on your graphics card, then only those ports will detect it. Try using different ports to see if this is the case.
Additionally, your monitor may require you to set the display to the same port as it’s plugged into. See if your display has a menu button to accomplish this.
7. Move your GPU to another slot
If you are using a dedicated graphics card and the monitor is plugged directly into it, you may try plugging the graphics card itself into a different slot on the motherboard.
8. Run the hardware and devices troubleshooter
Windows 7, 8, 10, and 11 come with a program built for troubleshooting hardware.
- Start by opening Settings on your computer, then navigate to Update & Security.
- Locate and click Troubleshoot, then Hardware & Devices.
- In the window that opens, hit the Next button in the bottom right-hand corner to start the detection process. Once this completes, a new window will appear.
- In this new window, select the problems you want to be fixed, then hit Next in the bottom right. We want the troubleshooter to detect issues with the external monitor, so look for that in the list.

If you can’t find the troubleshooter, or it appears to be missing, you can launch it using Command Prompt. Simply open Command Prompt, and use the command:
msdt.exe -id DeviceDiagnostic
Then follow the above steps just as if you had opened the program manually.
Software solutions to the second monitor not detected problem
1. Update your video drivers
Video drivers are separate from Windows, so manually updating them may be necessary. What drivers you need are dependent on your CPU/GPU, so you’ll have to visit the appropriate manufacturer’s website in order to do this.
2. Roll back the latest video driver
If this issue occurred after a video driver update, you could try restoring your video driver to its previous version.
- Hit the Windows key on your keyboard and type in “Device Manager”.
- Open the app that appears in the search results. You can also accomplish this by holding the Windows key and tapping R, then typing “devmgmt.msc” into the text box that appears and hitting OK.
- In the Device Manager, find your external display in the list, right-click it, then select Properties.
- In the window that appears, switch to the Driver tab.
- Look for a button labeled Roll Back Driver. If you updated your video driver within the past couple of days, this button should be clickable. Do so, and follow the prompts to restore the previous video driver and remove the updated one.
- If it’s been more than 2-3 days, this button will be grayed out. It means you’ll have to go to the website of the manufacturer of your GPU and manually download the previous driver in order to complete this process.

3. Match your monitor refresh rates
The refresh rate, or how quickly your monitor updates what it’s showing you, needs to be synced between your computer and external monitors, or it will cause detection issues. You will need to know what refresh rate your computer requires in order to complete this step.
- Right-click an empty spot on your desktop, then select Display Settings from the list.

- In the new window, locate and click on Advanced Display Settings.
- Under Choose Display, click the drop-down menu and select the external monitor in question.
- Locate and click Display Adapter Properties under Display Information. It should open another window.
- Switch to the Monitor tab, then locate the drop-down under Monitor Settings. Use this drop-down to change the refresh rate to one your display can handle.

4. Check your screen projection settings
It’s possible that your computer is simply trying to send information to your external display incorrectly, and that causes the didn’t detect another display Windows error.
- Hold down the Windows key on your keyboard, and while doing so, tap the P key and release.
- A small menu should open in the bottom right of your screen. Select the projection option you want to use here: duplicate for an exact copy of your main display, extend for a second desktop.

5. Refresh the display detection
Sometimes, there’s nothing physically wrong, and your computer just needs a specific reset to solve second monitor detection issues.
- Open Settings, then click on System. You can access Settings from the Windows menu, or by holding the Windows key and tapping I.
- Locate and click Display in the new menu.
- Go into the Rearrange Your Displays menu, then click the Detect button in the bottom right-hand corner.

6. Connect a wireless display (if possible)
If a physical connection simply isn’t working, you can try connecting a wireless external display instead.
- Open Settings, then click on Devices. You can access Settings from the Windows menu or by holding the Windows key and tapping I.
- Locate and click Bluetooth & Other Devices in the new menu.
- Select the Add Bluetooth or Other Device option, then click Wireless Display or Dock.

- Put your wireless display into discoverable mode, locate and select it from the list of available devices and complete the setup prompts.

7. Scan for hardware changes in Device Manager
Aside from video drivers, your external monitor has its own set of necessary drivers. Windows is supposed to detect and download these drivers automatically, but if this fails, you can manually instruct it to do so.
- Hit the Windows key on your keyboard and type in “Device Manager”. Open the app that appears in the search results.
- Locate and click the Action drop-down menu in the top left-hand corner of the window.
- Select Scan for hardware Changes from the list.

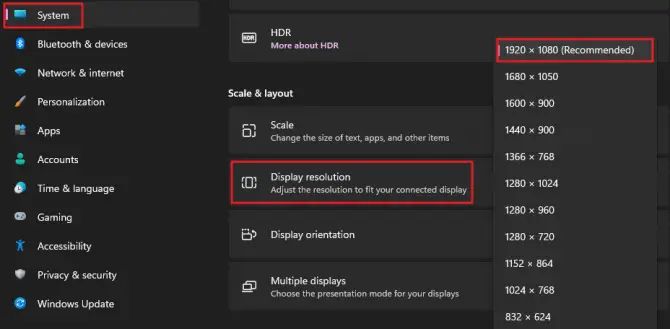
8. Match your resolution size to each monitor
If your external display simply isn’t displaying an image correctly, you may need to adjust the resolution to fit the screen properly.
- Open Settings, then click on System. You can access Settings from the Windows menu or by holding the Windows key and tapping I.
- Locate and click Display in the list on the left, then select the image of the secondary display on the right.
- Locate the drop-down under Display Resolution and click it to select a screen resolution that fits properly.
9. Change the display orientation
Although uncommon, it’s possible your computer is having trouble detecting your second monitor because of how the external display is oriented.
- Open Settings, then click on System.
- Locate and click Display in the list on the left, then find Display Orientation.
- Try switching the orientation and back again.

Specific solutions to the didn’t detect another display error using Nvidia or AMD Radeon third-party software
1. Enable activate all displays
This method is used to resolve incorrect 3D settings on an Nvidia graphics card. It can also help when Windows cannot detect the second monitor.
- Right-click on an empty spot on your desktop, then select the NVIDIA Control Panel from the menu that appears.
- In the window that opens, open the 3D Settings menu, then click Configure SLI, Surround & PhysX.
- Locate and click Activate All Displays under SLI Configuration.
- Click the Apply and OK buttons to finish this process.
2. Set up Eyefinity in AMD Radeon software
Similarly to Nvidia, AMD Radeon graphics cards can control various display settings. Setting up Eyefinity will have similar results as Activating All Displays for Nvidia.
- Right-click on an empty spot on your desktop, then select show more options and choose the AMD Radeon Software from the menu that appears.

- Locate and click on the gear icon to open Settings.
- Navigate to the Display tab and click on AMD Eyefinity.
- Select the Quick Setup option on the next screen, then follow the prompts until finished.
Conclusion
Sometimes plug-n-play isn’t as smooth as we’d like, and an undetected monitor is definitely one of those times. Despite the accompanying frustration, the extra desktop space is well worth the effort of getting that second display up and running so you can get back to doing what you do best.